VOTE DAILY FOR YOUR FAVORITE 2024 IMAGES!
learn more >>>
VOTING IS GOING ON NOW!
The
END OF THE YEAR AWARDS 2024

Shooting Strobes
April 8, 2025

By Brian D. Smith | Article From Belle Lumière Volume XIX
To be perfectly honest, I started shooting strobes with film because I didn’t know anyone who was doing it. All the studio film work I had seen was window-lit, often from the side. While beautiful, it lacked the shadows, depth, and drama I craved. Around the time I began experimenting with studio strobes and digital cameras, I loaded a roll of film into my Hasselblad H1 and shot my first-ever studio strobe portrait on film. The subject was my grandfather—the man I admire most, who started my film journey by gifting me his old Zeiss TLR. The portrait was a success. I shot it on Kodak TMAX 400 film. It wasn’t perfect, with deep blacks and bright whites, but not much tonality. Yet, it was brilliant. I was hooked.
Soon after, I sold the Hasselblad and didn’t attempt strobes in the studio again until the following year when I picked up a Contax 645. My first attempt with the Contax didn’t go as planned. I recklessly assumed the sync speed was 1/125 of a second, and got back two rolls from the lab with the shutter curtain covering half the frame. This is the biggest risk with film and strobes, but once you refine your process and stick to it, the results can be just as consistent and predictable as shooting film in natural light.
My Process: Consistency is Key
My process is fairly consistent every time I shoot. I try to use the same lighting setup, partly to establish an identity for my portraits, but also to ensure predictable results. I set up my lights in approximate positions, recalling how I had set them up previously. To make things easier, I started taking photographs with my phone of my lighting setups each time I shoot, so I can quickly replicate them on my next project. I darken the room as much as possible and use the modeling lights on the strobes to fine-tune the height and angle of the lights. The modeling lights on most strobes aren’t bright enough to fully dial in the lighting unless the room is almost completely blacked out.
Since my studio is in a shared living space, I don’t have the luxury of complete darkness, so I get it as close as I can, then shoot digital to make adjustments. I often ask myself if shooting film in the studio is really necessary, especially when I’m already setting everything up digitally. I always edit a few digital shots after each shoot and am usually pleased with the results. However, the reasons for shooting film in studio still apply. Film has a much broader tonal range, and the depth and texture of skin tones are superior. There are other reasons I prefer film, which I’ll touch on later.

Camera & Light Power Settings
My film speed (ISO) is typically fixed, ranging from 100 to 400, depending on the film stock I’m using. The whole point of shooting strobes is to have full control over your light direction and quality, so you’ll want to set your camera settings to eliminate ambient light. This means shooting at a high aperture. I generally shoot at F8-F13 in studio. Of course, this requires a strobe powerful enough to expose the film properly. For my key light, I typically fire at ¼ power. This is enough to allow for a high aperture without exhausting the strobe if I need to fire in quick succession.
The Contax 645 has a setting specifically for strobes. On the mode dial, I set the camera to “X,” which sets the shutter speed to a default of 1/90s. The strobe light peaks so quickly that it exposes the frame faster than 1/90s—closer to 1/1000s. The 1/90s is used by the camera to sync the front and rear shutter curtains with the strobe. This is why a high aperture is important. If the shutter is firing at 1/90s, we’d likely pick up some ambient light at lower apertures, even with a low-speed film.
I trigger the strobes using the brand’s wireless hot shoe trigger meant for Canon cameras, which just happens to fit the Contax 645’s flash shoe. I set all flash powers manually on the trigger. I highly recommend test firing the strobes with the camera before loading film. However, if you’ve already loaded film and forgot to test fire, there’s a hack: I set the camera to multiple exposure mode, put the lens cap on, and can fire away without exposing the frame.
Lighting Principles for My Signature Look
I follow a few basic lighting principles to achieve my signature look:
- I use the largest, softest modifier for my key light that I can fit in my studio space.
- I place my subject as close to the key light as possible without the light modifier entering the camera’s field of view.
- I use a fill light to soften the shadow side, typically setting its power 3 stops lower than the key light.
- I position the key light as high as possible while still ensuring it catches in the subject’s eye. When the catch light disappears, I know the light is too high.
- I often create a Rembrandt or loop lighting pattern with the key light, meaning the light is angled down and to the side so that the nose shadow connects to or has a small gap from the cheek shadow.
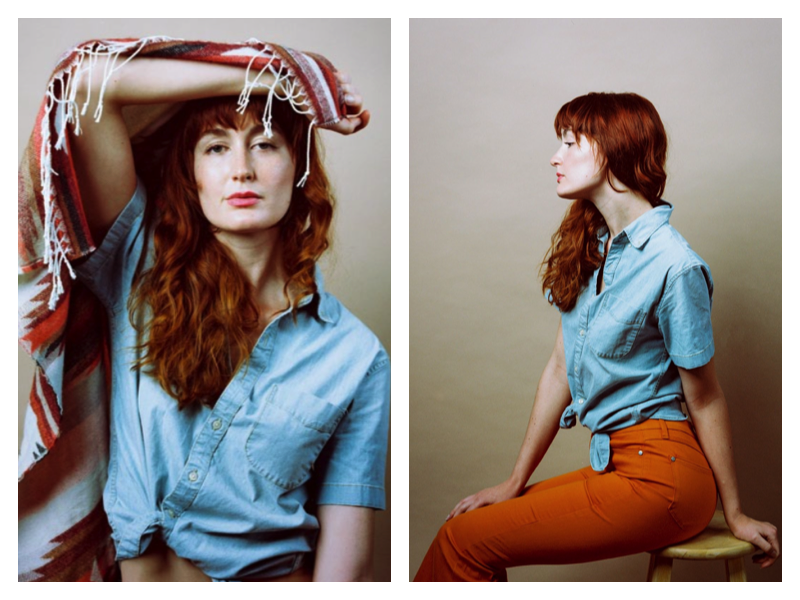
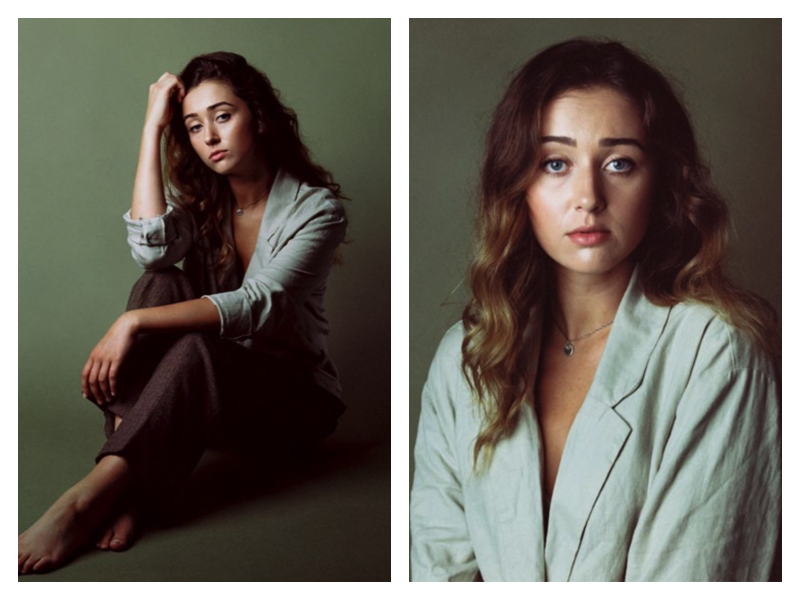
I tend to prefer softboxes over umbrellas because they produce a soft, beautiful light pattern while still creating contrast and shadows, minimizing light spill onto the backdrop and surrounding walls. My key light is typically a large octabox. I always start by turning on only the key light. After setting its position and power, I add the fill light to soften the shadows. I find the ideal key light position is about 30 degrees off-center to the right or left and 45 degrees off vertical, pointing down at the subject.
The further I angle the key light downward, the more the nose shadow dips. If the nose shadow starts running too far down the face, it becomes unflattering. It’s important to maintain that catch light in the eye—once the key light is too high, the eye no longer reflects its light, leaving it dark and lifeless. Angling the key light to the left or right will lengthen the nose shadow, and it will connect to the cheek shadow, creating Rembrandt lighting—a universally flattering pattern that’s slightly more dramatic than loop lighting.
I then position my fill light high and to the opposite side of the key light. I position it high enough to avoid creating a second catch light in the eye, which can look unflattering. I tend to angle my fill light more to the side since it won’t be casting a shadow, allowing a bit of light to wrap around the backside of the subject’s head or hair.

Metering & Final Thoughts
I use my digital camera to dial in the light positions and the relative power of the key and fill lights. I then meter the flash with my light meter and trust its readings. It has never steered me wrong. My Sekonic L-558 has a flash power mode that helps me determine the correct aperture for exposure. After adjusting flash power or aperture, I check the reading again and make any necessary tweaks.
Shooting in the studio with film consistently provides the look I want, and it forces me to slow down and think more about each image. While digital can be preferable in certain situations, particularly when there’s a lot of subject movement, I turn to film for those slow, dramatic portraits. The colors, depth, and tonal range in the shadows give a portrait incredible character—something I’ve never been able to replicate with digital cameras.
There’s also a certain romance in film’s imperfections. All the portraits in this article were shot on 15-year-expired Kodak Portra 160VC. Expired Kodak films often take on a red tint in the shadows, and I love how this adds subtle character to a portrait. While shooting expired film can be risky, some skillful editing can recover fogged film and bring out beautiful results.
Shooting film in the studio has become my preferred method. It allows me to slow down, intentionally build an image, and pay attention to every detail. Film fits this process effortlessly. My biggest piece of advice for anyone shooting studio portraits, especially on film, is to take your time and fine-tune your lighting. Make adjustments until everything is just right. Sometimes, I’ll spend 20-30 minutes tweaking the lighting and positioning the subject for the perfect shot. The end results have been some of the most rewarding images of my short photography career.
About Brian D. Smith
Brian D. Smith is a portrait and wedding photographer based in Charleston, South Carolina, and Northern Michigan. His work focuses heavily on storytelling, highlighting the unique and beautiful qualities of his subjects. Brian loves soft, elegant portraiture, but he also embraces gritty imperfection. His work is influenced not by trends, but by what inspires him artistically and by the qualities of his subjects that make their stories unique. His style is inspired, romantic, and fashionable, driven by a desire to create deeply personal work that transcends the boundaries of a profession.
Website: briandsmithphotography.com
Instagram: @briandsmithphotography
Equipment Used:
- Contax 645 + 140mm F4
- Godox AD600 Pro TTL
- 2 x Godox AD200
- Godox Xpro Canon Wireless Trigger
- Sekonic L-558 Light Meter
- Wescott 48” Rapid Box Octabox
- Glow Parapop 28” Softbox

